
The Art of the “Cookie Box”
Valentine’s Day is all about the little things that say, “I thought of you.” And what feels more personal than opening a beautifully packed box of homemade cookies?
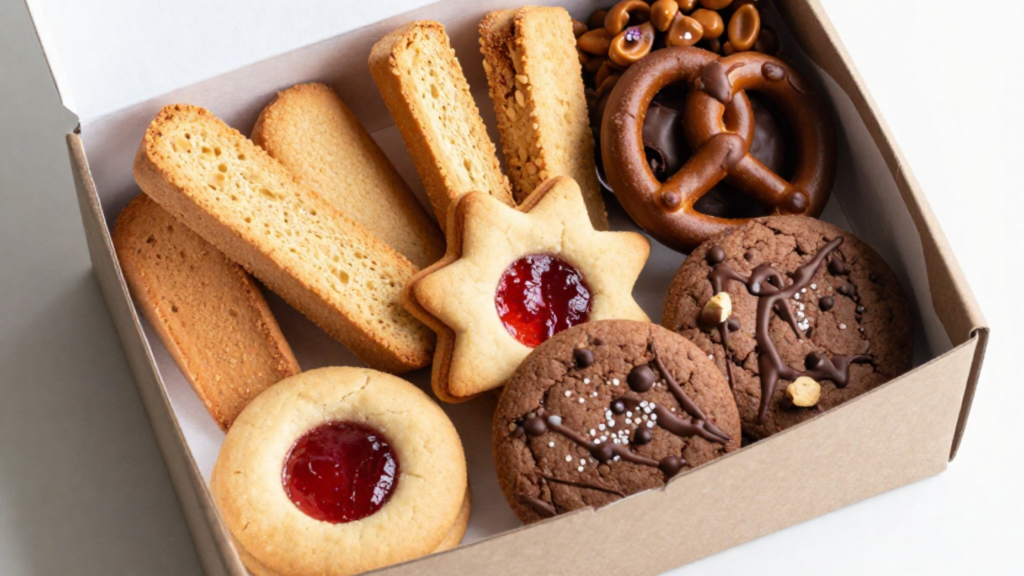
Imagine lifting the lid and finding a mix of soft, crunchy, chocolatey, and fruity treats—each one chosen with love. It’s not just about sugar; it’s about their favorite flavor, a nostalgic classic, and one sweet surprise that makes them smile.
So, how do you build a Valentine’s cookie box that feels romantic, thoughtful, and perfectly balanced? Let’s put it together.
Ingredients:
- The Comfort Classic: A big, reliable Brown Sugar Shortbread or a Chewy Ginger Cookie. This is the one everyone reaches for first.
- Something with a Snap: Think Crispy Almond Thins or a Vegan Biscotti. That crunch is what makes the box feel like a professional collection.
- The “Wow” Factor: This is your star. Maybe a Linzer Cookie with a bright jam heart or a Double Chocolate Sea Salt cookie that looks extra indulgent.
- Tiny Treasures: Little extras like Homemade Toffee Bits, Chocolate-Dipped Pretzels, or even just some Sugared Walnuts to tuck into the corners.
- Personal Touches: A few dried flower petals or a simple piece of kitchen twine can make the whole thing feel handmade and high-end.
Equipment:
- A Beautiful Box: It doesn’t have to be fancy—a simple wooden crate or even a sturdy cardboard box lined with pretty paper works wonders.
- Parchment Paper: Essential for keeping things clean and preventing different cookies from getting “greasy” on each other.
- Small Muffin Liners: Use these like little nests for your smaller treats or truffles.
- A Little Ribbon: Because everything feels more like a gift when there’s a bow to untie.
Instructions:
Pick Your Palette:
Think about the colors and flavors. If everything is brown, add a pop of color with a jam-filled cookie or a sprinkle of green pistachio. You want it to look like a little treasure chest when the lid comes off.
Make It Ahead:
Don’t try to bake everything in one day! Most cookie doughs freeze beautifully. Bake one or two types at a time over a few days so you aren’t stressed out when it’s time to pack the boxes.
The “Safety First” Layout:
Put your toughest, sturdiest cookies on the bottom and in the corners. They act like the “walls” of your box, protecting the more delicate, crumbly ones in the center.
Mind the Neighbors:
Try not to put a very soft cookie right next to a very crunchy one, or the crunchy one will start to soak up the moisture and get soft too. If you’re worried, a little slip of parchment between them works like a charm.
Fill Every Gap:
A half-empty box looks a bit sad. If you have extra space, fill it with those “Tiny Treasures” like nuts or candies. It makes the box feel generous and full of life.
The Scent of Home:
Close the box as soon as the cookies are fully cool. When your friend opens it, they’ll get that amazing “bakery” smell right away.
Tips for Success:
- Cooling is Key: It’s tempting to pack them while they’re still warm, but don’t! Even a little heat creates steam, and steam turns your beautiful cookies into a soggy mess.
- Keep Strong Flavors Separate: If you have a peppermint cookie or something very lemony, wrap it separately. Otherwise, the whole box will end up tasting like mint or lemon!
- Think About the Journey: If you’re mailing the box, stick to “sturdy” bakes and avoid anything too fragile that might turn into crumbs during a bumpy ride.
Also read: How to Fix Common Cookie Baking Problems
Note:
At the end of the day, a cookie box is about sharing something you made with your own hands. It doesn’t have to be “perfect” to be wonderful. It’s the variety and the thought behind the flavors that people will really remember.
Disclaimer: This blog is intended for educational and informational purposes only. Results may vary depending on ingredients, equipment, and technique. Always follow safe baking practices and use caution when handling hot ovens, sharp tools, and food.